Layer 4 vs Layer 7 proxy

In the last couple of posts, we talked about what is a reverse proxy and how to implement it using Envoy proxy. In this post, we will understand how a layer 4 proxy is different from a layer 7 proxy, and deploy these using Envoy proxy.

Before jumping into the difference between layer 4 and layer 7 proxy, it makes sense to revisit the OSI model or open system interconnection model. OSI model helps us visualize networking communication as 7 layered representation, where each layer adds functionality on top of the previous layer.

For OSI Model Refer

https://en.wikipedia.org/wiki/OSI_model

https://medium.com/software-engineering-roundup/the-osi-model-87e5adf35e10

Focusing on layer 4 and layer 7, we understand a very important difference. At layer 7, we have a complete request coming in from the client i.e. we understand what the actual request is? is it a GET request or a POST request? is the end-user asking for /employee or /department? whereas at layer 4 all we are looking at is data packets in raw format, hence there is no way for us to know what resource is being requested for.

Layer 7 implementation makes sure that the proxy receives all the incoming packets for a request, recreates the request, and makes a call to the backend server. This helps us implement certain features like TLS offloading, data validation, rate limiting on specific APIs, etc. On the other hand, for Layer 4 proxy, all we are doing is passing on the packets being received to the backend server. The advantage here is that it is fast (no data processing) and can be considered secured (again we are not looking into data). Based on application need one can choose either layer 7 or layer 4 proxying.

A good explanation on layer 4 vs layer 7 proxy

It makes sense now to pick up from where we left Envoy proxy implementation in the last post. We used envoy.filters.network.http_connection_manager which helps us implement layer 7 reverse proxy. To extend the example, we will add one more hello world implementation.

static_resources:
  listeners:
    - name: listener_0
      address:
        socket_address: { address: 127.0.0.1, port_value: 8080 }
      filter_chains:
        - filters:
          - name: envoy.filters.network.http_connection_manager
            typed_config:
              "@type": type.googleapis.com/envoy.extensions.filters.network.http_connection_manager.v3.HttpConnectionManager
              stat_prefix: ingress_http
              codec_type: AUTO
              route_config:
                name: local_route
                virtual_hosts:
                - name: local_service
                  domains: ["*"]
                  routes:
                  - match: { prefix: "/" }
                    route: { cluster: some_service }
              http_filters:
              - name: envoy.filters.http.router
  clusters:
    - name: some_service
      connect_timeout: 1s
      type: STATIC
      lb_policy: round_robin
      load_assignment:
        cluster_name: some_service
        endpoints:
          - lb_endpoints:
            - endpoint:
                address:
                  socket_address:
                    address: 127.0.0.1
                    port_value: 1111
            - endpoint:
                address:
                  socket_address:
                    address: 127.0.0.1
                    port_value: 2222

You can see we have added another localhost application server running at port 2222. For sake of differentiating we have made these 2 applications return “Hello world 1111” and “Hello world 2222”. Now when we hit localhost:8080 for envoy proxy, we can see we are getting both the results alternatively.

$ curl localhost:8080

Hello World 1111

$ curl localhost:8080

Hello World 2222                      

To convert the existing Envoy proxy config YAML to support layer 4 routing, we just need to change the name and type of filter to envoy.filters.network.tcp_proxy

static_resources:
  listeners:
    - name: listener_0
      address:
        socket_address: { address: 127.0.0.1, port_value: 8080 }
      filter_chains:
        - filters:
          - name: envoy.filters.network.tcp_proxy
            typed_config:
              "@type": type.googleapis.com/envoy.config.filter.network.tcp_proxy.v2.TcpProxy
              stat_prefix: ingress_http
              cluster: some_service
  clusters:
    - name: some_service
      connect_timeout: 1s
      type: STATIC
      lb_policy: round_robin
      load_assignment:
        cluster_name: some_service
        endpoints:
          - lb_endpoints:
            - endpoint:
                address:
                  socket_address:
                    address: 127.0.0.1
                    port_value: 1111
            - endpoint:
                address:
                  socket_address:
                    address: 127.0.0.1
                    port_value: 2222

You can see the YAML looks simpler as we cannot support path-based routing in layer 4 reverse proxy. The results remain the same as hitting localhost:8080 will still hit backend servers running at 1111 or 2222, but as explained above, the mechanism being used behind the scenes has changed.            
Envoy Proxy

In the last post, I talked about proxy servers and how they are an integral part of the cloud and microservices-based design. It makes sense to get our hands dirty and try out setting a reverse proxy. I have chosen the Envoy proxy for this example.

Envoy proxy can be installed on most of the popular OS and also has a docker installation. The site gives very good documentation for getting started –https://www.envoyproxy.io/docs/envoy/latest/start/start. For this example, I am setting up an envoy proxy on Mac OS.

First of all, make sure you have brew installed. Then execute the following commands to install envoy proxy

brew tap tetratelabs/getenvoy

brew install envoy

Finally, check the installation: envoy --version

Once we are satisfied with the overall installation, we can run a simple test case, where we will redirect traffic coming to the envoy proxy to an application server. To start with, I have deployed a simple hello world application on port 1111.

$curl localhost:1111

Hello World

Now in order to get started with envoy proxy, we will take simple YAML settings file and modify it to our needs. https://www.envoyproxy.io/docs/envoy/latest/configuration/overview/examples#static

static_resources:
  listeners:
    - name: listener_0
      address:
        socket_address: { address: 127.0.0.1, port_value: 8080 }
      filter_chains:
        - filters:
          - name: envoy.filters.network.http_connection_manager
            typed_config:
              "@type": type.googleapis.com/envoy.extensions.filters.network.http_connection_manager.v3.HttpConnectionManager
              stat_prefix: ingress_http
              codec_type: AUTO
              route_config:
                name: local_route
                virtual_hosts:
                - name: local_service
                  domains: ["*"]
                  routes:
                  - match: { prefix: "/" }
                    route: { cluster: some_service }
              http_filters:
              - name: envoy.filters.http.router
  clusters:
    - name: some_service
      connect_timeout: 1s
      type: STATIC
      lb_policy: round_robin
      load_assignment:
        cluster_name: some_service
        endpoints:
          - lb_endpoints:
            - endpoint:
                address:
                  socket_address:
                    address: 127.0.0.1
                    port_value: 1111

A couple of things to observe in the above YAML file, first observe the filter we are using here. We are using envoy.filters.network.http_connection_manager which is the simplest filter we use to redirect traffic. The second important thing to observe is the source and destination ports. We are listening to the traffic at port 8080 and redirecting to port 1111. This is a simple example where both envoy proxy and application server are running on the same local machine, whereas this would not be the case in the real world and we will see more meaningful usage of cluster address. For now, let’s run and test the envoy proxy.

Start envoy proxy with the config YAML created.

envoy --config-path ~/Desktop/workspace/envoyexample.yaml

Once the envoy is started successfully, you will see we are able to hit port 8080 and getting the output from port 1111 that we started earlier.

$curl localhost:8080

Hello World

Reverse Proxy Pattern

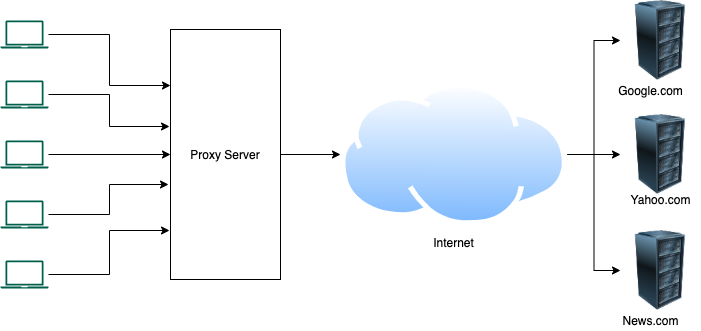
The reverse proxy pattern is a very common pattern used when we use a microservices-based design. Before understanding reverse proxy, it makes sense to spend a minute to understand what the term proxy means in terms of the Internet. Proxies are usually used by big organizations to control traffic. The image below helps us illustrate the use of the proxy layer.

Proxy Layer

In a normal scenario when a machine accesses a site like google.com, it will know that the traffic is coming from the A.B.C.D IP address. But if we introduce a proxy layer in between, the client machine for google changes from A.B.C.D IP to the Proxy machine. So google will not know about the actual client requesting data.

Use of Proxy layer gives organizations control on traffic in terms of

  • Anonymity
  • Caching
  • Logging usage
  • Block Sites

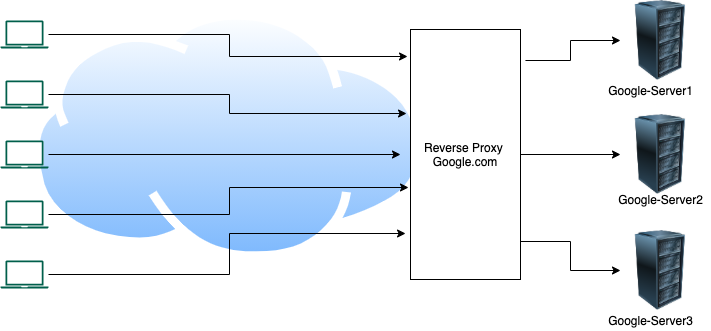
Coming to Reverse Proxy, as the name suggests, it reverses the effect of proxying. That is, instead of introducing the proxy layer at the client-side, we have the proxy layer at the server or provider side. Let us how the flow looks with help of the image below.

Reverse Proxy

As we can in the image above that in the case of reverse proxy, the proxy layer shields actual servers where services are implemented. For the external world, the reverse proxy server is the actual destination implementation, for the example shown above, anyone looking for google.com will hit the reverse proxy server say A.B.C.D IP address. But A.B.C.D is not the machine actually processing the requests. It receives the request and passes it on to a backend server which actually fulfills the request and returns the results back to the caller.

A reverse proxy server help achieve features like

  • Caching
  • Load Balancing (send same requests to any of the servers among a set)
  • Ingress (take multiple types of requests and choose the correct server)
  • Canary / Blue-Green deployments

The reverse proxy pattern can be extended to provide many more features like rate limiting, authentication/ authorization, TLS offloading, etc. Most advanced tools fall under the category of API Gateway. There is a thin line between Reverse proxy and API gateway and you can at times feel the terms being used interchangeably. The video below tries to demystify the line between API Proxy and API Gateway.