A load balancer works at layer 4 i.e. transport layer and route traffic based on source IP address and port, to a destination IP address and port. Application gateway works at layer 7 or application layer hence can help make decisions based on incoming calls. For example, you want to route certain kinds of traffic to a specific endpoint.
Azure Application Gateway provides the following features
A load balancer is a tool that helps us manage traffic coming to a web application. In the simplest form, let’s say the application is deployed on two or more machines, so the role of the load balancer here would be to make sure that incoming requests load is evenly distributed on all the machines. Also if one of the servers is down or not responding, the load balancer will be responsible for detecting this failure and redirect the traffic to healthy machines.
To see the load balancer in action, let’s bring up two (or more as per convenience) VM’s in Azure and install the IIS server.
Create a Resource -> Add Virtual Machine -> Choose “Windows Server 2016 Datacenter” image-> Add access for RDP (3089) and HTTP (80) ports.
Make sure both the machines are part of the same Availability Set (or Virtual Scale Set).
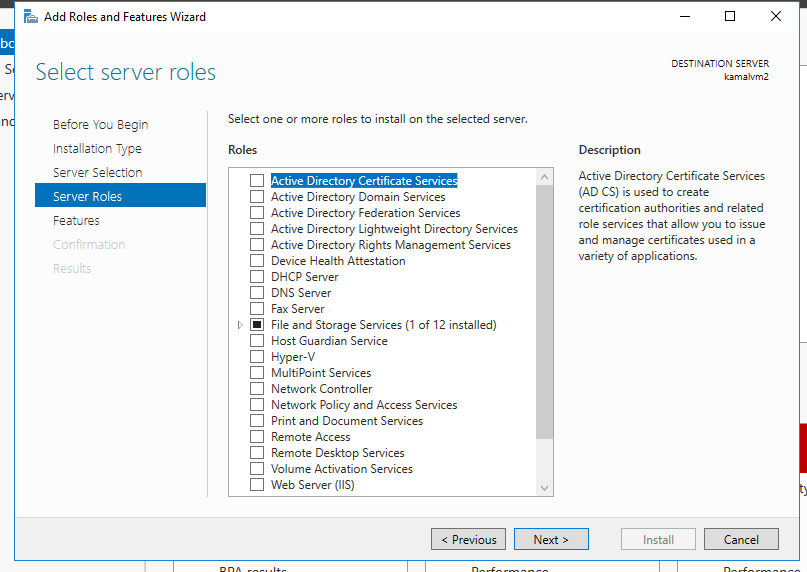
RDP to the machines, you will see Server manager (or bring it up)
Choose the option to Add roles and Features, and go ahead and add the IIS server.
Finally, make sure that the windows firewall allows traffic on port 80. Go to “Windows firewall and advanced security options” -> Inbound Rules -> Add New Rule ->Type port ->number 80.
Once the above steps are done, you can access the IIS server default page when you will hit the IP address of these VMs. To distinguish between the two webpages, you can make some modifications to either of them.
Go to C:\inetpub\wwwroot -> update html or image.
The next step is to set up the load balancer. Add a new resource -> Load balancer. First thing you will need to provide backend pool, for which you will choose the availability set in which both the VMs are available (or Virtual Machine Scale Set), next you will need to set up Health probe, as both our VMs are listening on port 80, you can simply set the port 80 for health probe. If the load balancer senses some problem with a machine based on the interval (seconds after which the load balancer ping the health probe) and unhealthy threshold (number of failures occurred after which load balancer treats the node as failure), the load balancer will stop sending traffic to that node.
Finally, you will set up a Load balancing rule, where all you need to provide is an incoming port on which traffic is expected, backend pool and health probe which we had already setup. Once this is set up, you can hit the load balancing URL and see that traffic is directed to the IIS page we set up earlier. If you will refresh the page multiple times you will be able to see traffic is going to both the server randomly. If one of the servers is shut down, the load balancer keeps on working fine with traffic redirected to the second server.
In addition to load balancer rule, one can also set up NAT rules, which are usually used for forwarding traffic on a port to a specific VM. Here is a good reference for that
In the last post, we talked about Azure Active Directory (AD). There can be cases where an organization is already using Active Directory, and when they onboard to Azure, they want to synchronize the on-premise identity data to azure to keep using the local security policies. This can be achieved through Azure AD connect.
Azure AD Connect needs two things, an AD Connect sync component to be available on an on-premise environment and Azure AD Connect sync service running on Azure AD.
Password hash synchronization – A sign-in method that synchronizes a hash of a users on-premises AD password with Azure AD.
Pass-through authentication – A sign-in method that allows users to use the same password on-premises and in the cloud, but doesn’t require the additional infrastructure of a federated environment.
Federation integration – Federation is an optional part of Azure AD Connect and can be used to configure a hybrid environment using an on-premises AD FS infrastructure. It also provides AD FS management capabilities such as certificate renewal and additional AD FS server deployments.
Synchronization – Responsible for creating users, groups, and other objects. As well as, making sure identity information for your on-premises users and groups is matching the cloud. This synchronization also includes password hashes.
Health Monitoring – Azure AD Connect Health can provide robust monitoring and provide a central location in the Azure portal to view this activity.
Azure Active Directory or AAD as it is commonly known, is a powerful tool that helps manage users and their access. Let us start by taking a look at the official definition by Microsoft
Azure Active Directory (Azure AD) is Microsoft’s cloud-based identity and access management service, which helps your employees sign in and access resources in:
External resources, such as Microsoft Office 365, the Azure portal, and thousands of other SaaS applications.
Internal resources, such as apps on your corporate network and intranet, along with any cloud apps developed by your own organization.
The Azure Active Directory (Azure AD) enterprise identity service provides single sign-on and multi-factor authentication to help protect your users from 99.9 percent of cybersecurity attacks.
One key term here “Single Sign On” or SSO. Let’s assume that you work for a company that requires you to access multiple applications for example, your email, an HR system, a leave management system, a project management system, an employee directory, and so on. Now think of a scenario when you are required to sign into all these applications independently. For each application, you have a separate set of credentials, that you need to remember and hence weaken the security. Additionally managing access is also difficult for admins as in scenario when an employee leaves the company or joins the company, an admin ends up adding or removing credentials to multiple applications, which again is error-prone.
To handle such problems, Single Sign on provides us with a mechanism to manage user identities in a single place and provide or manage access to different applications. Azure Active Directory is such a system helping manage user identities at one place and control access to various applications and resources on cloud.
We can see Azure provides us with a very simple way to create Azure Directories, manage users, groups and roles. In addition, it also allows you to manage the user, setting like if the user needs multi-factor authentication if a user is located in a specific country and can login for there only, etc.
What is a virtual network? Often, an application cannot be deployed in isolation on a single machine. There will be multiple servers interacting with each other. There might be multiple backend servers, frontend servers, and databases involved. Often it is a requirement that these resources work together for an application to work smoothly. Virtual Network provides a virtual boundary inside which these resources can exist and communicate with each other, at the same time being isolated from the rest of the world.
Creating a Virtual Network
Creating a Virtual Network is pretty straightforward in Azure. You can select a Virtual network resource and Add a new one. But while creating you will need to take care of two things – Address space and Subnet.
Address Space is a range of internal IP addresses that can be used for the Virtual Network, hence determines how many resources can be added to the Virtual Network. The address space used is defined in terms of CIDR (Classless Inter-Domain Routing or Supernetting). One needs to be careful while giving address space range especially if we are planning to use multiple Virtual networks that need to connect as we should keep address ranges unique in that case to avoid overlapping.
Subnet is setting up smaller network ranges within a Virtual network. This is particularly useful when you would like to subgroup elements within a network, for example setting up a different subnet for frontend servers and backend servers.
Communicating with on-premise resources
Point to Site There are times when a user wants to connect to a network, for example, accessing an office network from a personal laptop to access emails. Point to Site Connectivity through a VPN client to VPN Server is the best option in this case.
Site to site We saw that we used a point-to-site case when we need to provide a single point to communicate with the VPN. Similarly, whole a particular location or an office needs access to a virtual network we can create a site to Site Connection with Virtual Network Gateway.
Expressroute Expressroute is a dedicated private connection from the source to the VPN. Microsoft provided a set of locations to which users can connect using a dedicated private line and get onboard to Expressroute.
Communicate among VPNs
There will be cases when resources in one VPN need to communicate to resources in another VPN on Azure. The best way to achieve this is by using VPN Peering.
“Virtual network peering enables you to seamlessly connect Azure virtual networks. Once peered, the virtual networks appear as one, for connectivity purposes. The traffic between virtual machines in the peered virtual networks is routed through the Microsoft backbone infrastructure, much like traffic is routed between virtual machines in the same virtual network, through private IP addresses only. Azure supports: VNet peering – connecting VNets within the same Azure region Global VNet peering – connecting VNets across Azure regions” –https://docs.microsoft.com/en-us/azure/virtual-network/virtual-network-peering-overview
Jumpbox Pattern When accessing and managing Virtual network resources from outside, jumpbox pattern is a common mechanism. Basically, one machine in the virtual network is designated as jumpbox, this jumpbox is accessible from the outside world but no other resources can be accessed. Once the administrator is on jumpbox machine, he will be able to manage other resources through jumpbox in a controlled manner. Azure provides Bastion service to help implement Jumpbox pattern.
An important aspect of any application is scalability. We need to make sure our applications can scale up and scale in based on the load faced by the application.
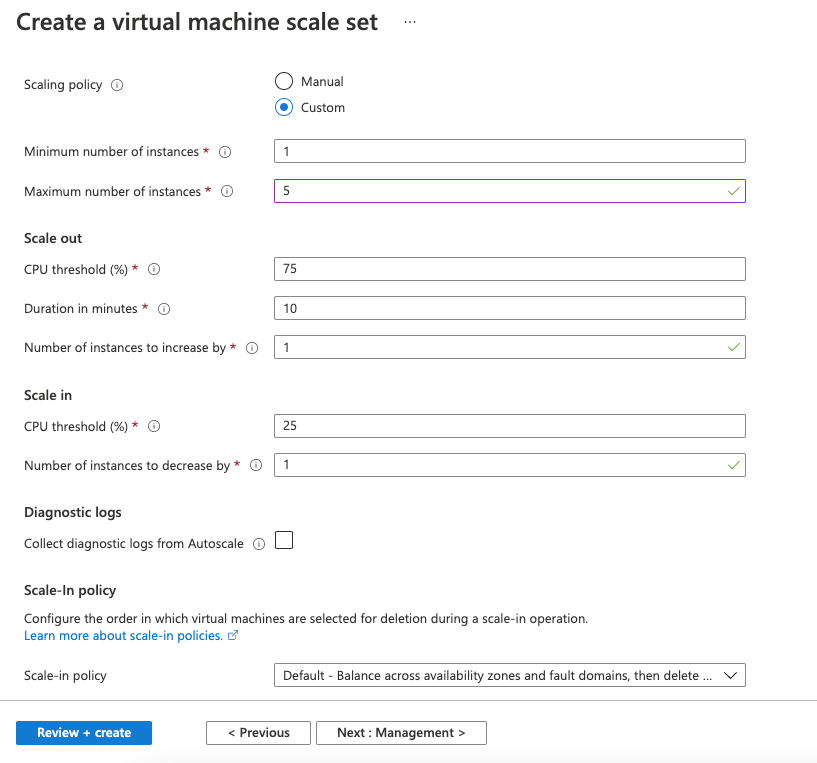
Azure helps us with proving the concept of VM scale sets. Once can create scale set, mentioning rules on scaling up or scale in VMs containing our application.
Scale Set setting
The image above shows that we are setting up a scale set, where we are saying that we want our application to be deployed on a minimum of 1 VM and a maximum of 5 Vms based on the load being handled. The rule we are setting is based on CPU usage, we are mentioning that if the CPU usage is more than 75% for 10 minutes continuously, add one VM. Similarly, when the CPU usage is less than 25%, we will decrease VMs by. Behind a load balancer, VMs will handle the traffic in a distributed manner and scale up or scale in based on the load being handled.
Let’s take a look at what the Azure website talks about availability sets.
An availability set is a logical grouping of VMs that allows Azure to understand how your application is built to provide for redundancy and availability. We recommended that two or more VMs are created within an availability set to provide for a highly available application and to meet the 99.95% Azure SLA. There is no cost for the Availability Set itself, you only pay for each VM instance that you create.
Availability is one of the important aspects of any application. An application going down for a few seconds can cause a business loss. To avoid that, we deploy applications on multiple VMs so that the request can be served even if one of the VMs is down. Say we deploy the application to 2 VMs. But how can we make sure both the VMs are not down at the same time. Azure help us manage availability using Availability sets.
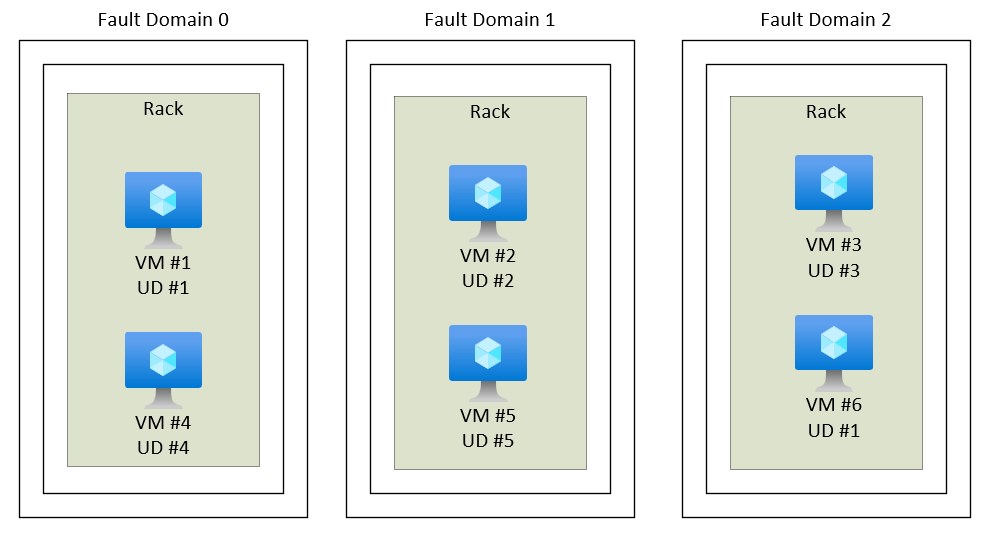
To understand availability sets we need to understand the concept of fault domain and update domain. Each infrastructure unit is dependent on factors like power, cooling, etc. Azure makes sure each such unit has proper demarkation. So when you create an availability set, Azure make sure the VMs you are creating are in different fault domain.
Secondly, Azure might need to do some maintenance, like hardware or software updates for inrastrcuture. again Azure makes sure to create an update domain cluster in a way, that updates are never done on all VMs in an availability set in one go.
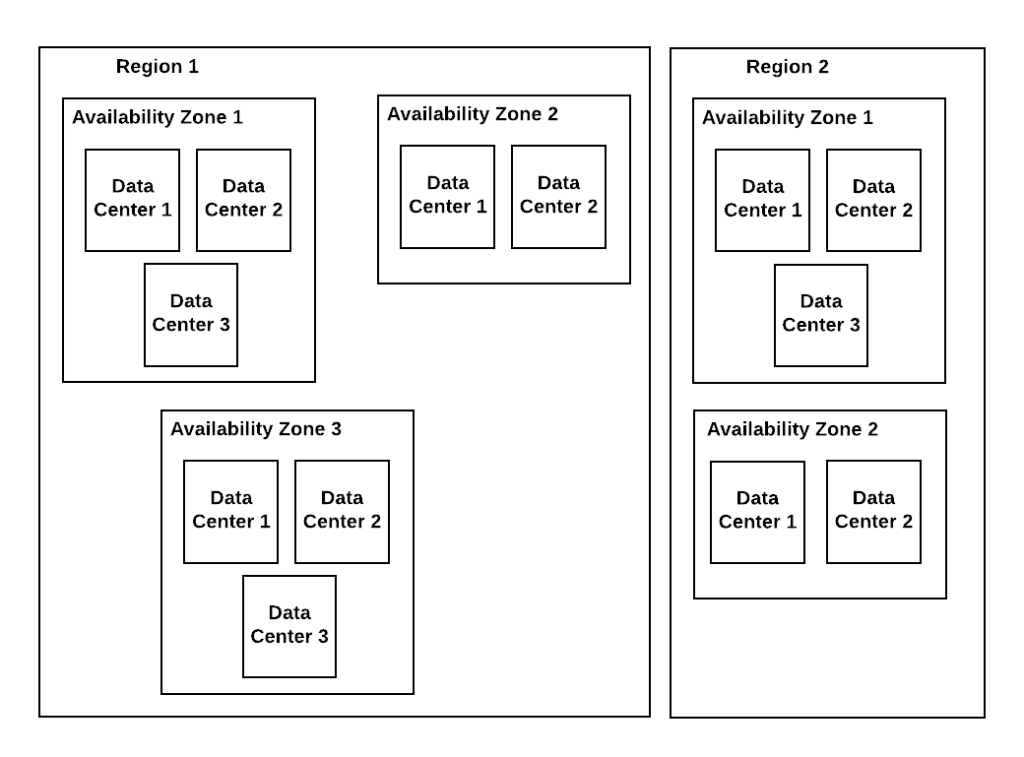
When talking about the cloud, it is important to understand how the infrastructure is managed. Three basic concepts
Region: A Region is a separate geography unit where the cloud has a presence in terms of infrastructure.
Availability Zone: Within a region, a cloud has multiple availability zones, to handle local failures.
Data Center: Within an availability zone, the cloud can have multiple data centers. It can simply be a building where infrastructure is managed for a cloud.
Understanding this concept is important to manage disaster recovery scenarios and making sure available. For example, when you are storing data, you will be asked what kind of replication strategy you need. A Local replication would mean that data is replicated within the datacenter, so in case of disk failure, your data is safe and available. Whereas in the case of zone replicated data, it would mean that data is copied across the zones and can handle a data center failure. Finally, a region or cross-geo replication makes sure that data is replicated across regions, making sure you never lose your data even if a whole region is down. Each strategy has a cost impact, so based on the criticality of data one needs to choose the strategy that fits best.
Storage is one of the most important aspects provided by any cloud service provider. At the end of the day, you need a good storage solution for managing your data, code, backups, executables, and basically everything. You would need a different types of solutions to manage different types of data, like data which you access frequently vs one which is used once in a month, data that has sensitive information vs the one which all users should be able to access, data which should be stored in a relational database vs the data which should be stored on NoSQL database, the list goes on.
Azure has a solution to all your needs. Let’s take a look at different storage options provided by Azure.
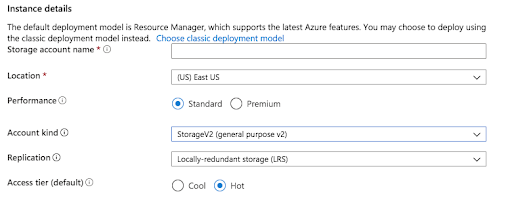
Location: You would like to choose a location nearest to your access point for better performance.
Performance: Standard performance is cheaper and will save your data on magnetic drives whereas Premium storage will save on solid-state drives and is good for data that need high performance.
Account kind: Storage V2 and V1 are general-purpose storage accounts where V2 will give you an option of Cool or Hot Access Tier, which can be selected based on how frequently the data is used. Another Account kind is blog storage, which specializes in data storage in blob form.
Replication: Locally Redundant Storage – Replicated across different racks in single data storage. This will manage hardware failure. Zone Redundant Storage – Replicates data in different zones in a region. This makes sure even if a data center is down, you don’t lose the data. Geo-Redundant Storage – Data is replicated across geographies. GRS replicates your data to another data center in a secondary region, but that data is available to be read-only if Microsoft initiates a failover from the primary to a secondary region. Read-access geo-redundant storage (RA-GRS): is based on GRS. RA-GRS replicates your data to another data center in a secondary region and also provides you with the option to read from the secondary region. With RA-GRS, you can read from the secondary region regardless of whether Microsoft initiates a failover from the primary to a secondary region.
Now with Azure storage, we can use one of the following services
Blobs: Blobs are Binary Large Objects. Blob storage is also known as Object Storage, is perfect for storing binary and text data. Medial files, images, documents, application installers, etc are the best fit for this type of storage. The maximum file size that can be stored is 4.77 TerraBytes. Azure Data Lake storage works on top of Blob Storage.
Files: As the name suggests this type of storage is best when dealing with files. This also gives us SMB 3.0 protocol support which means you can directly be mounted on local or remote machines. File storage can be attached to VMs and accessed.
Tables: The solution should be considered when we need to store data in tabular form.
Queues: We can set up queues for message-based communications. Messages can be published and read from these queues.
Accessing Storage Accounts Azure provides us two core mechanisms to access objects in storage, one by using the storage access keys, where 2 secured keys are provided, and secondly by using a shared access signature which is used for temporary and limited access.
Securing Data Data at Rest – One can use encryption for securing data at rest. Azure provides transparent data encryption by default (can be turned off) for databases (the master database is not encrypted).
Data in transit- Data in transit can be secured by using HTTPS and smb 3.0 protocols.
Data in execution- Azure provides TEE or Trusted Execution Environment and Confidential computing with DC series virtual machines.
Authentication and authorization are the most important security features to be implemented for any API. One way to manage this information is through sessions. Once users log in, a session is created on the server-side for the user with user metadata information. The problem with this approach is that this is stateful and difficult to scale. Another way to implement the metadata is to send back a hash or a key once the user logs in successfully, and every subsequent request needs to pass this key back. This key is stored along with user metadata is stored in the database to avoid statefulness. The disadvantage here is an additional database query, every time a request comes in.
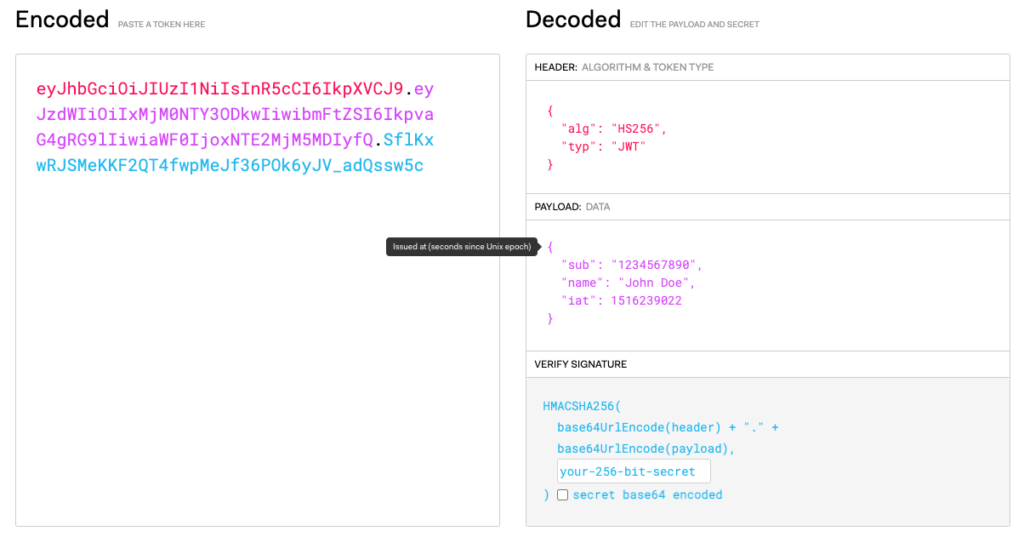
JWT or JSON Web Token solves this problem. JWT is a string in JSON format, encrypted with a key. The encryption can be symmetric or asymmetric. JWT contains 3 sections, a header, a payload, and a signature.
Header: The header JSON normally contains two fields, a type (typ), which is always “JWT” and alg field providing algorithm used for encrypting the token.
{
"alg": "HS256",
"typ": "JWT"
}
Payload: This section contains JSON for any payload or data you want to send. This can contain fields that can identify the user and their roles for authorization and authentication. This can also have iat or Issued At time and token expiry time (exp).
Signature: The signature is the encrypted part of the token. The encryption is done using the algorithm mentioned in the header. The signature can only be decrypted using the secret key.